Files library
You will need the information in this section when you want to utilise the files library on your Haiku website.
Uploading a file directly into the files library.
- Navigate to your files library (make sure that you are logged in, and have all of the appropriate editing priviledges). You can get to the files library in two different ways:
- Use the 'Choose Actions' drop down menu located on the top right of any page on your haiku website.
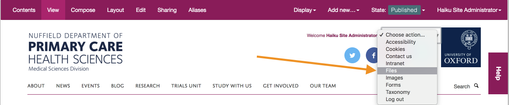
- Use the 'Contents' tab from the home page of your website and select' 'Files' from the list displayed to you.

- Use the 'Choose Actions' drop down menu located on the top right of any page on your haiku website.
- On the Files library landing page, you will see a search box that allows you to filter the files in your file library. You will also see two headings:
- 'Documents by section' - If you click on this heading, the accordion navigation will expand, and you will see a list of folders that contain your files.
- 'All files' - This section of the page is showing all of the files in your files library, paginated and in chronological order, with the most recently uploaded file at the top of the page.
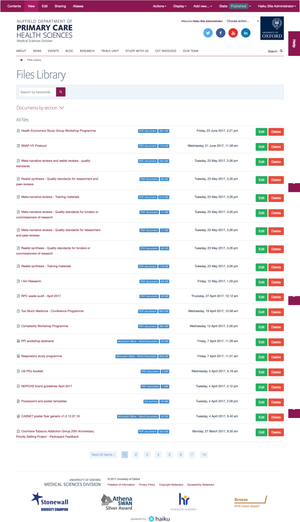
- Along with being able to use the search filter, clicking on any of the tags tot he right of the file name, will also filter all of the files in the file library by the filter that you choose.
- You are only able to upload a file into a section of the files library. This is to ensure that the files library is kept clean and tidy, so you will need to have at least one folder in the files library, before you can upload any files.
- To upload a a file, click into the section that you would like to store the file in, and you will be taken to a page that displays a list of the files that are in the folder, as well as an area to upload new files into the folder.
- To upload a single file, or multiple files, either drag and drop the file/s over the blue drop box, or click on the drop box to open your computers file chooser where you can select one or mutliple files, and click the upload button. You are also still able to use the 'Add new' menu on the edit bar to add files to the files library.
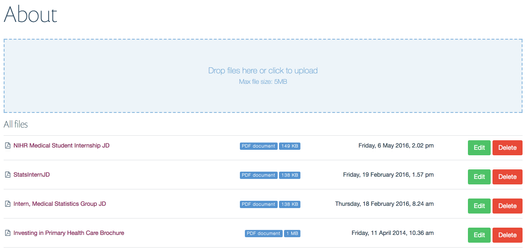
- Once your files have been uploaded you will need to refresh the page in order to see the files in the file list.
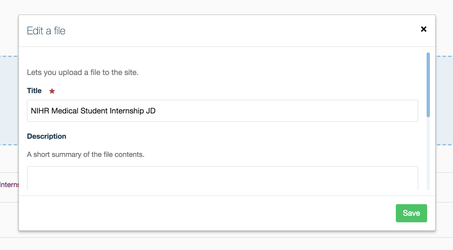
- To edit any of the files in the file library, click the 'Edit' to the right of the file title. You wil see a pop up that will let you edit the attributes of the file.
- To delete any of the files in the file library, simply click the 'Delete' button to the right of the file name. You will be asked to confirm that you really want to delete the file.
Uploading a file directly through the rich text editor on any item of content
- Navigate to the page or tile that you want to make a downloadable file available on (make sure that you are logged in, and have all of the appropriate editing priviledges).
- Click 'Edit' on the edit bar, or 'Compose' if you are working on a cover page.
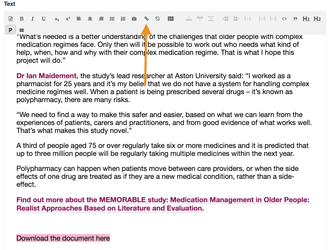
- Highlight the text in the rich text editor that you want a user to click on to downoad the attached file.
- Whilst the text is highlighted, click on the hyperlink icon on the formatting bar of the rich text editor
- You will see a pop up that allows you to either create a hyperlink from the highlighted text, or link to a file for download. To upload a file into the files library that will allow you to link to it from the text, you need to navigate to the files library using the shortcut in the top right of the pop up

Once you have clicked on the shortcut, you will be taken to a page that shows you all of the folders in the files library. Click into the folder that you would like to upload the image to. You will see the list of files already in that folder.
Please note, if you do not see any available folders when you navigate to the files library, you will need to go to the files library first to create one (see 'Uploading a file directly into the files library' at the top of this page, as you cannot have orphaned files in the library.

- To upload a file into the selected folder, click the 'Upload' button in the bottom left of the pop up
- When you click on the 'Upload' button, you will see the form to upload a new file on the right side of the pop up
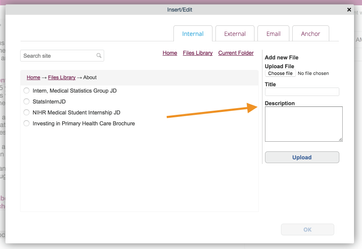
- The form has 3 fields:
- 'Upload file' - click on the button to open the file chooser on your computer
- 'Title' - this is the title of the file
- 'Description' - this field allows you to add a description to your file that will help you to find it when searching your file library
- Once you have filled all of the fields click 'Upload', and your file will be loaded into your selected folder
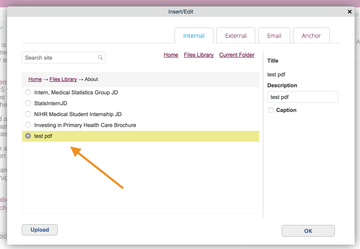
- You can now select the file and click the 'OK' button in the bottom right of the pop up, and the text that you highlighted will now be linked to the file that you have uploaded. You will know that the link has been successful by the text changing to your text highlight colour and the wording being underlined.
- Save the page that you have been working on, and you will see the changes having taken place.