Webpage
You will need this information when you are using a webpage on your Haiku website.
Step-by-step guide for adding a webpage
- Navigate to the section where you would like to add the webpage. (Please note, you can only add webpages to templates that will allow for them)
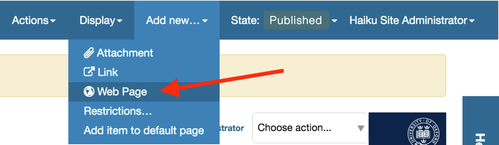
- At the top of the page, use the 'Add new' drop down and select 'Webpage'
- You will then be taken to an edit interface, where you can add content to the page.
- There are four tabs on the webpage edit interface. 'Content', 'Media', 'Categorization' and ''Settings'.
Using the 'Content' tab:
Body content fields
'Short title'
This field is designed for you to use, if your item of content has a very long title. If you populate this field, the URL will be defined from the title that is in here, as will the links in the navigation for it.
'Summary'
This field is for plain text, that will show in search results and listings. This should be populated with a to the point description of what content the page contains. Use keywords to get better search results from search engines, and don't make it too long.
'Text'
Enter text into the 'Text' box. You can then use the formatting options to present the text as you would like to, adding images, and other media as well, to create a dynamic page.
'Sortable name'
This field is redundant and will be removed from the system shortly.
Dates
'Publishing date' and 'Expiration date'
The publication and expiration dates work like this:
When an item is past its expiration date, it's marked "expired" in red in its document byline when viewed.
An item whose publication date is before the current date doesn't get extra text in its byline.
In both cases, the item is "unpublished", which is not to be confused with a workflow state.
It merely means the item doesn't show up in listings and searches.
These listings include folder listings.
However, the owner of the item will keep seeing it, which is handy because you like to know what you have lying around in your site.
Expired items in a folder are marked as such when viewing the folder_contents.
There's no quick way of seeing if items in a folder listing are not yet published.
When you set an unpublished item as the Content view for a folder, that item will be shown.
Unpublishing an item doesn't have any effect for admins. They will always see unpublished items in their listings and searches.
Giving another regular users rights ("can add", can edit", "can review") on the item doesn't make it any less unpublished for those users.
A practical way for a non-admin user to access an unpublished item is directly through its URL.
Using the 'Settings' tab.
Settings fields
'Table of contents'
- This field is obsolete, it will be removed from the system.
'Exclude from navigation'
If selected, this item will not appear in the navigation tree
- 'Hide the title'
- If selected, the title will not be shown at the top of the page.
- 'Allow discussion'
- If selected, this will allow discussion for this content object, and enable the commenting functionality. *Note: this field will only show if you have the 'Discussion' functionality configured.
- If selected, this will allow discussion for this content object, and enable the commenting functionality. *Note: this field will only show if you have the 'Discussion' functionality configured.
Using the 'Media' tab.
- Don't forget to save your changes.
To add additional content to an event page in tabs, accordion etc,please see the documentation here.
Using the display settings
You will require this information when you wish to change the template that the webpage is using. To change the display of the page, follow the steps below:
- Navigate to the webpage that you would like to be able to define the display setting for.
- Select the 'Display' tab located on the right hand side of the edit bar.
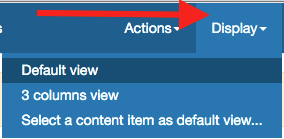
- You have 2 views to chose from (note that the 'Select a content item as a Content view', is for section landing pages only):
- 'Content view' - this is the regular view that all webpages Content to. This view is a 2 column view. It provides you with a narrow column on the left side of the page. This is designed to be used for navigation and promoting any other type of content that you wish to, using the 'Primary portlets'. The column on the right, is then used for the body content of the page. This will display your page like this:

- '3 columns view' - this view will turn your page into a three column layout. This will mean that you have the ability to use the 'Secondary portlets' as well as the 'Primary portlets', as well as keeping a wider middle column for the pages body content.

- 'Content view' - this is the regular view that all webpages Content to. This view is a 2 column view. It provides you with a narrow column on the left side of the page. This is designed to be used for navigation and promoting any other type of content that you wish to, using the 'Primary portlets'. The column on the right, is then used for the body content of the page. This will display your page like this:
Related articles