Basic OSCE Exam Setup
This guide will help take you through the very basics of how to a set up a simple OSCE exam in Practique. This covers only the barest minimum tasks to set up an exam. It covers how to do things, but not why. For best practice, there are many additional things you may want to look into, such as dimensions or constraints, which are ways to categorise exams and questions. The guide will take you through the following steps:
- Set up your blueprint
- Create your OSCE stations (in Items)
- Combine OSCE stations into an Exam (in Item Sets)
- Schedule your Exam
- Publishing Exam
Deliver Exam
Logging In
- Log into Practique.

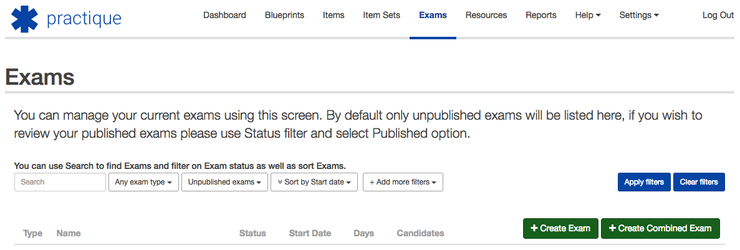
- Once logged into Practique, you will see the tab bar at the top:

Each tab means as follows:
- Dashboard: where your current exams show
- Blueprints: the framework of the exam
- Items: the questions or stations
- Item Sets: the papers or collections of stations that make up a particular exam
- Exams: where you create the exams; details including date, time, standard setting to be used etc.
- Resources: where you upload documents used for each station e.g. Examiner info pack, actor briefing notes, student briefing. It can include documents, images, videos etc.
- Reports: where you find reports on completed exams. Note: not covered in this basic tutorial
- Help: access to Knowledge Base to get further help, Services Desk to report problems or bugs, Practique HQ for updates about Practique Note: not covered in this basic tutorial
- Settings: access to user management, device management, OSCE global marking settings and candidates & examiners management
Blueprints
This is how you can define the information about the structure of the exam.
- Click on the Blueprints tab.
You are presented wit this screen: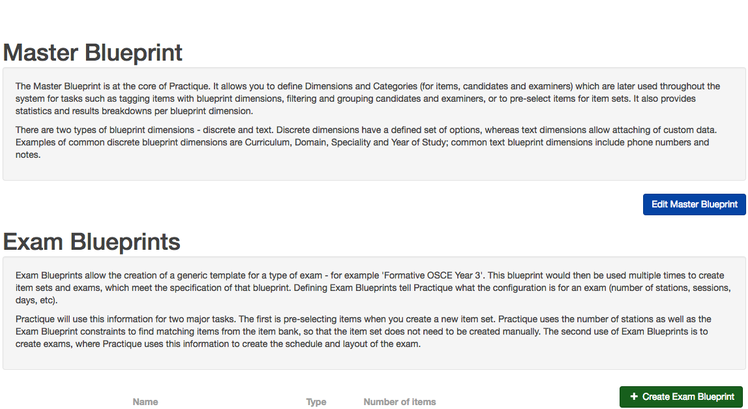
In order to run an exam in Practique you do not need a Master Blueprint but you always need to set your Exam Blueprint. - Click on Create Exam Blueprints.
The next screen you see is the create exam blueprint page.
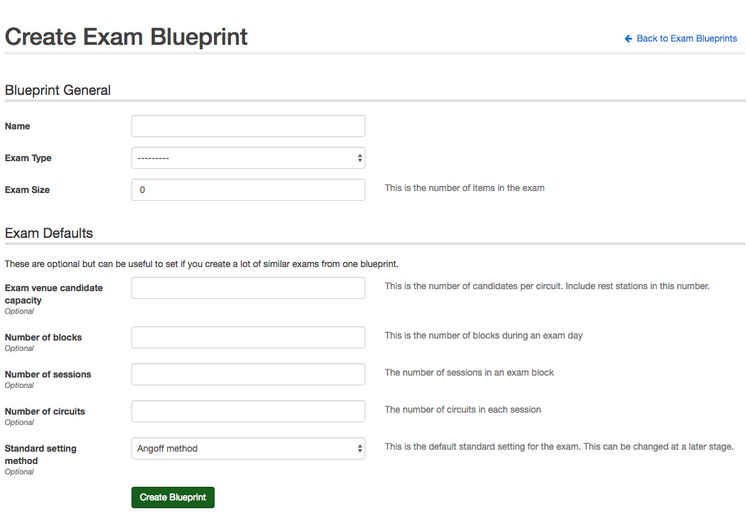
Give the exam a name. (Remember it, you’ll need it later!)
For exam type, select OSCE.
Exam size is the number of different questions or stations you need. For now, enter 2.
The remaining 4 questions are optional. For now, we will leave them blank. But explanations have been provided below.
- Exam venue candidate capacity: This is the number of candidates per circuit. Include rest stations in this number.
- Number of blocks: the number of sets of questions used in a day. If 1 set of questions is being used all day it would be 1 block. If 2 sets of questions are being used it would be 2 blocks.
- Number of sessions: the number of times the exam repeats itself in a day.
- Number of circuits: the number of simultaneous exams (rotations) running. For example, if using two rooms of 10 stations each, with each candidate taking 10 stations, you would enter 2.
- Standard setting method: the default standard setting for the exam. If you select one at this stage, it can be changed at a later stage.
- Click on Create Blueprint.
You are now taken to a screen to edit constraints for your exam. Constraints are limitations on the structure of the exam. This would be needed if you wanted to allow the questions to be automatically selected from a bank of questions. We won’t look at these for now.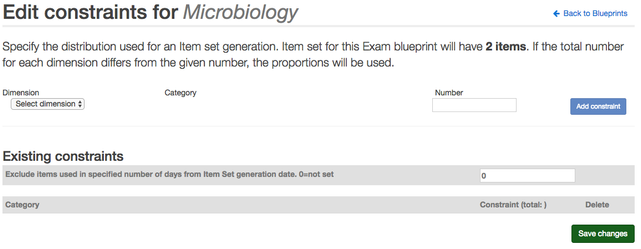
- Click on Back to Blueprints.
Items
This is how you create stations.
- Click on the Items tab.
- Click on Create new Item.
The next screen creates the outline of the item.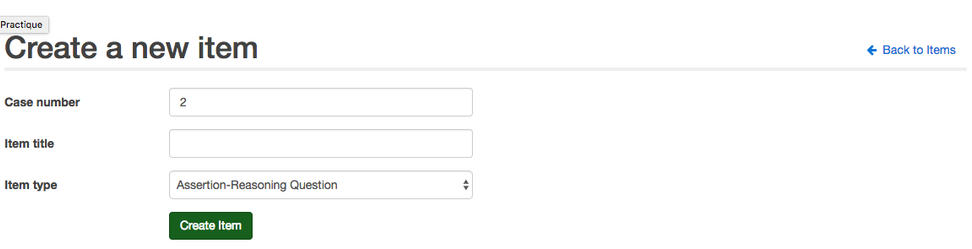
The Case number is automatically generated. - In Item Title enter a name for your question.
- For Item Type choose ‘OSCE Station’.
- Click on Create Item.
The next screen lets you enter information about the station useful for record keeping. You can enter details such as patient name and age and a summary of what the station involves e.g. History examination and blood results. We will not change any for now.
Click Save Item.
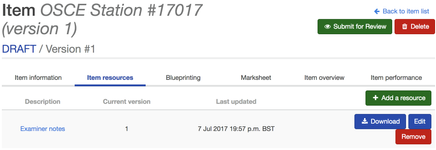
The next screen shows a new set of tabs:
- Item Information: The information you just entered and versioning
- Item resources: Add images, examiner info documents, actor briefings, student briefings, videos etc. to a station
- Blueprinting: Add ‘dimensions’ for automatic generation of exams
- Marksheet: Here you specify what questions the examiners should answer and how. You are creating the mark sheet.
- Item overview: Summary of the station
- Item Performance: Shows reports of how the station has performed in previous exams
- Go to the Item resources tab.
Here you can upload any images or information packs you want to be visible on the ipad. - Click Add a resource.
- In Resource Type, choose Examiner Notes.
Click Choose File and select a PDF of examiner notes.
Please note that once you have selected a file, a range of dimensions and categories will appear if your local administrator has created blueprint maps which allow you to tag Examiner Notes. If they do appear, for now, just ignore these additional tagging options.
- Click Add Resource.
- Click on the Marksheet tab.
Click on Add new criteria.
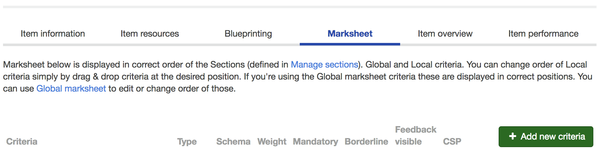
If the Marksheet does not contain any criteria yet, you would see two Add new criteria buttons close to each other. You can click on either of them to add a new criteria.
You should get a popup allowing you to enter the question information.
This tutorial presumes that your local administrator has set up the system so that it contains a Section called "Marks". If a Section has not been set, please follow the instructions on how to set up Sections in the blue box.
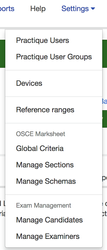
To set up a Marksheet Section:
1. Settings > Manage Sections > Provide a section name e.g. "Marks" > Add Section
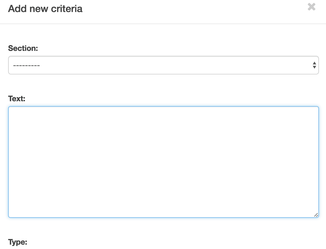
- In Section, choose ‘Marks’ – the section is the heading it will appear under.
- In Text, type the question to be answered. For example: “How well did the candidate perform?”
- The Type selection shows the ways in which the question can be answered, the ones you are likely to use are:
- Discrete: Select from a choice of values, e.g. 1, 2, 3 or good, ok, poor.
- Free text: A box in which to type whatever you like.
- For now, choose ‘Free Text’
- In Weight, type 0
Weight indicates how much a question is worth relatively for automatic marking. 0 means the result has no bearing. 1 Would be a normal marking, 2 would be worth double etc. Having mandatory unchecked means the examiner does not have to fill in the question. - Make sure Mandatory is not ticked.
- Leave Feedback visible to candidate not ticked.
- Click Save.
However, what if we wanted a ‘Pass’, ‘Borderline’, ‘Fail’ option for the question? - At the top bar, click on the Settings tab, then Manage Schemas
The schema page allows you to make custom mark types for questions. - Type a name (i.e. Good/Average/Bad) into the ‘Add a new schema’ box and click Add.
- Find the name you typed in the above list and click Edit Answer.

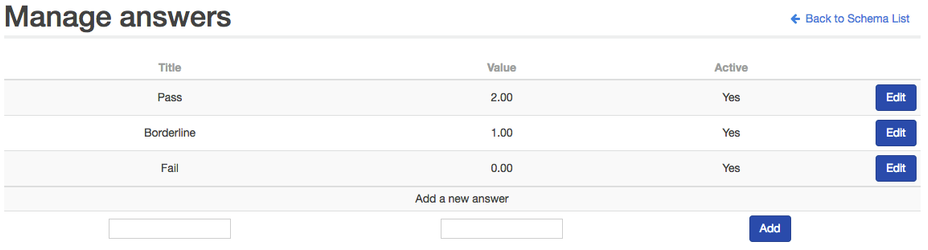
Now you can see the list of answers you can select for this question. - In Title, type ‘Pass’ – This is the name that appears on the screen
- In Value, type 2 – These are the points awarded to the candidate if the examiner chooses that answer.
- Click Add.
- Repeat this process for ‘Borderline’ – 1 and ‘Fail’ – 0
Now we can go back to our station. - Click the Items tab again
- Find your earlier station and click View.
- Click on the Marksheet tab
- Click on Edit next to the marking criteria you opted for previously. In Type, choose ‘Discrete’ instead of 'Free text'

- A new ‘Schema’ box will appear. Choose the name you gave to your schema.
- In Weight, type 1.
- Tick Mandatory.
- Leave Feedback visible to candidate not ticked.
- Click Save.

Now we need to submit the station. We won’t be sending this question for review, we will approve it immediately:
- Click Submit for Review.
- Leave the options as-is and click Submit.
- Click Approve (Green button).
- Click Approve (Blue button).
Congratulations, that station is ready to go. Try repeating the whole process to make a second station. Give it a different name and questions.
Item Sets
In the item sets tab, you will be able to combine stations into an exam, or questions into a paper.

- Click on the Item Sets tab
- Click on Create a new Item Set.
You are now presented with the ‘Create an item set’ screen.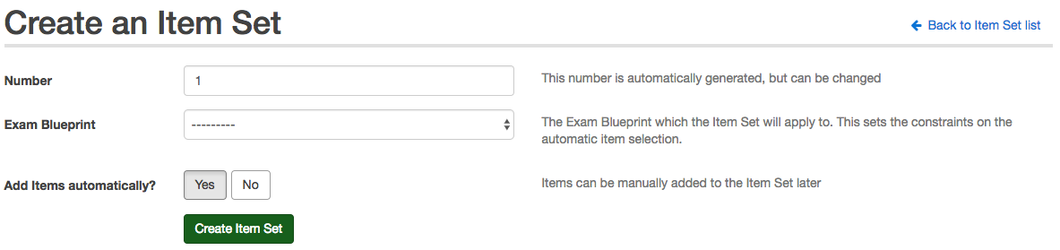
- In ‘Exam Blueprint’ select the name you gave to your OSCE at the beginning
- In ‘Add Items Automatically’ choose No
- Click Create Item Set.
In this screen, you can now add the stations to your OSCE.
- Click Add an Item.
In the following page you can see all the stations created.
- Find the two stations you have made and for each one, click Add.
- Click Back to Item Set.

The item set is now complete, as it only requires two stations, as we set in the earlier blueprint.
It is important that you make sure the stations are in the order that you want them to be in, the system will automatically decide for you which is station 1, 2 and 3 etc.
You need to move the stations until they are in the correct order by dragging and dropping them.
Now we need to approve the set.
- Click Submit for Review
- Leave the boxes blank and click Submit
- Click Approve (Green button).
- Click Approve (Blue button).
Exams
In the Exams tab screen, you will set up the detailed exam information such as rotations, examiners and students.
- Click Create Exam.
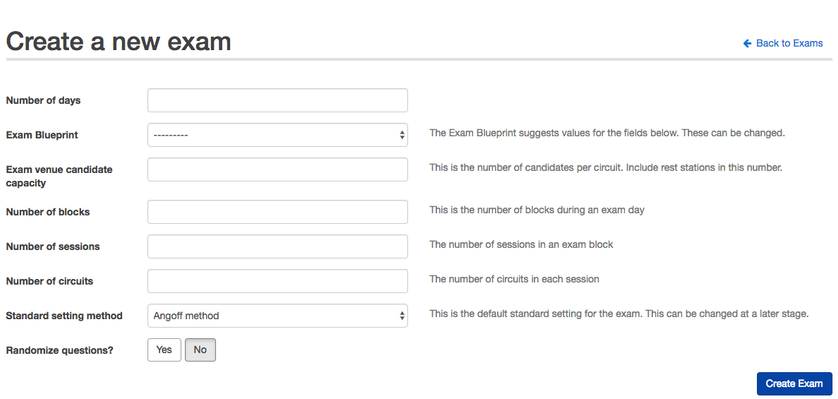
- In ‘Number of Days’ enter 1 (if you had 3 days of exams you would enter 3 here)
- In ‘Exam Blueprint’ select the exam you made earlier.
- In ‘Exam Venue Capacity’ enter 2 (this is the number of students a circuit can take including rests)
- In ‘Number of Blocks’ enter 1 –If you use a different set of questions in the AM and PM you would enter 2
- In ‘Number of Sessions’ enter 1 – This is the number of sessions that happen in each block or day. For example, if there are three sessions before lunch and three after and you are using the same the questions all day (1 block) you would enter 6. If you had 2 blocks (different set of questions in the morning and afternoon, you would enter 3.
- In ‘Number of Circuits’ enter 1 – this is the number of simultaneous exams (rotations) running, for example, if using two rooms of 10 stations each, with each candidate taking 10 stations you would enter 2.
- Leave ‘Standard Setting Method’ as Angoff and ‘Randomize Questions’ as No
- Click Create Exam.
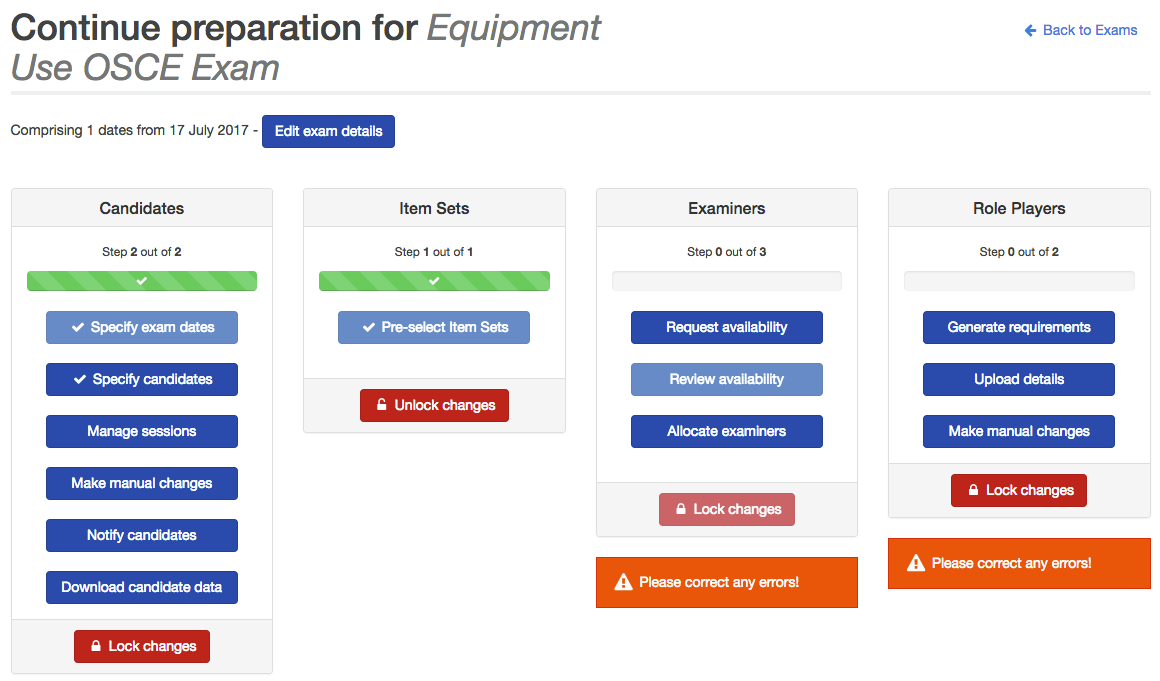
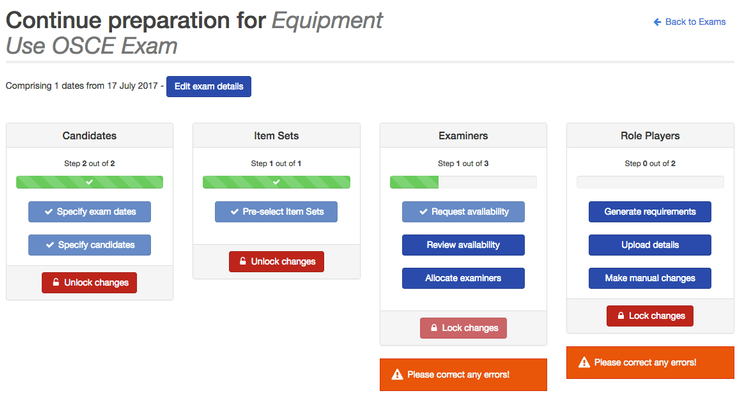
Now the exam has been created you will be taken to a screen that shows an overview of the elements of the exam that needs to be completed. This is split into Candidates, Item Sets, Examiners and Role Players. Not all OSCE exams will require Role Players so you do not need to fill in the details if not applicable.
It will also give you a warning in orange to specify exam dates. This is normal.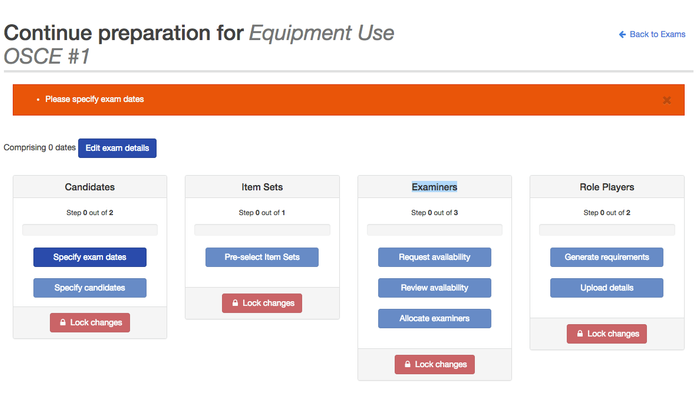
- Under ‘Candidates’ click Specify exam dates.
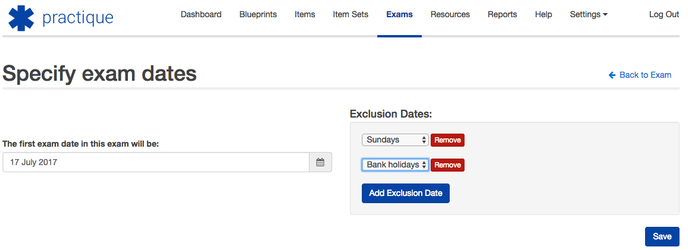
- In ‘The first date in this exam will be’ select today’s date.
- For now, ignore Exclusion Dates.
Click Save.
Now the Candidates bar is half filled in, and an item set is available.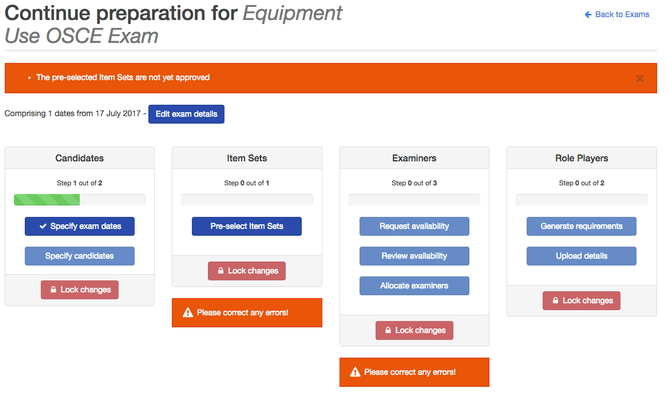
Please do not be alarmed by the orange warnings. These are there to guide you.
- Click Pre-select Item Sets.
- The item set may have already been automatically pre-selected. If yes, click Remove on any existing item sets so you can add your own Item Set. If not, proceed to the next step.
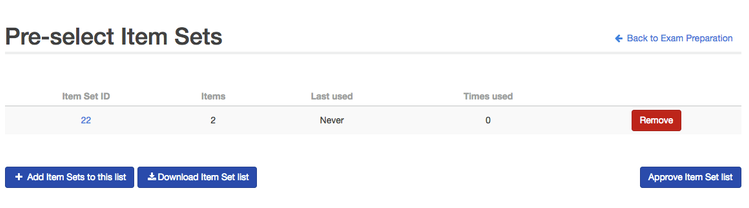
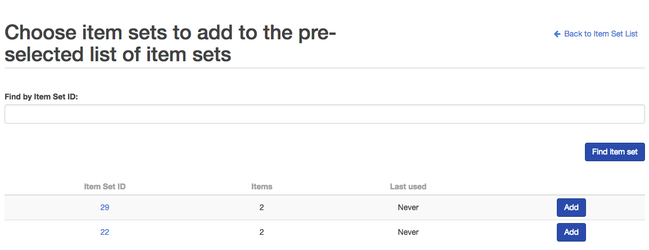
- Click Add Item Sets to add an Item Set or multiple Item Sets to the list.
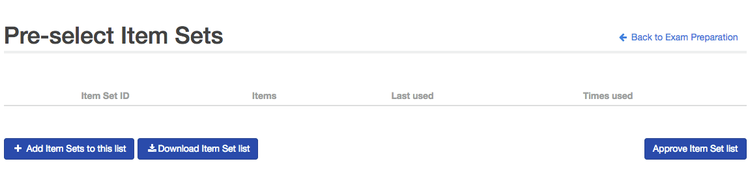
- Find your item set and click Add.
- Click Approve Item Set list.
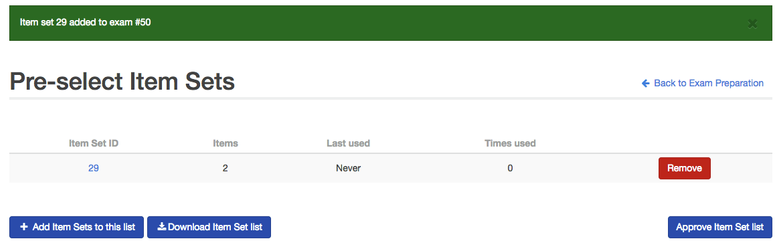
The item set bar is now complete.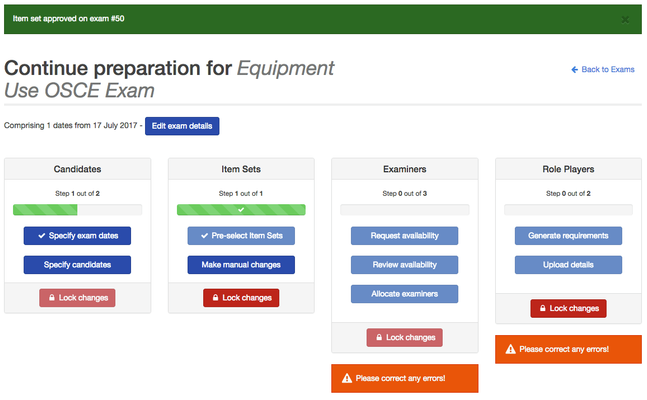
- Under item sets, click Lock changes.
You will be asked to confirm that you want to lock the changes.
Click Lock changes.
If you need to make any changes to the Item Sets, all you need to do is to unlock the changes by clicking the Unlock changes button.
Now move on to indicating which candidates
- Under Candidates, click Specify candidates.

This screen will let you upload students. You can either assign them manually from students created previously in "Manage Candidates" or upload the allocation directly using a CSV, which we will do here. A sample CSV is provided within the system and the following format is required:
- ID – The students university number or other identifiers (required)
- Last Name (optional)
- First Name (optional)
- Block – The full date, then a dash, then the block of the exam. E.g. “30 November 2016 – 1” (optional)
- Session – The Session for the student, e.g. “Session 1” (optional)
- Room – The station number the student starts at, e.g. “2” (optional)
- Circuit – The number of the rotation the student has been allocated to e.g. “1” (optional)
Important
If you are uploading candidates here for the first time you will not be able to add their email. To add an email for a candidate you will need to add that in the "Manage Candidates". This is very important if you want to email the candidate feedback report from Practique.
- Click on Upload Candidate allocation.
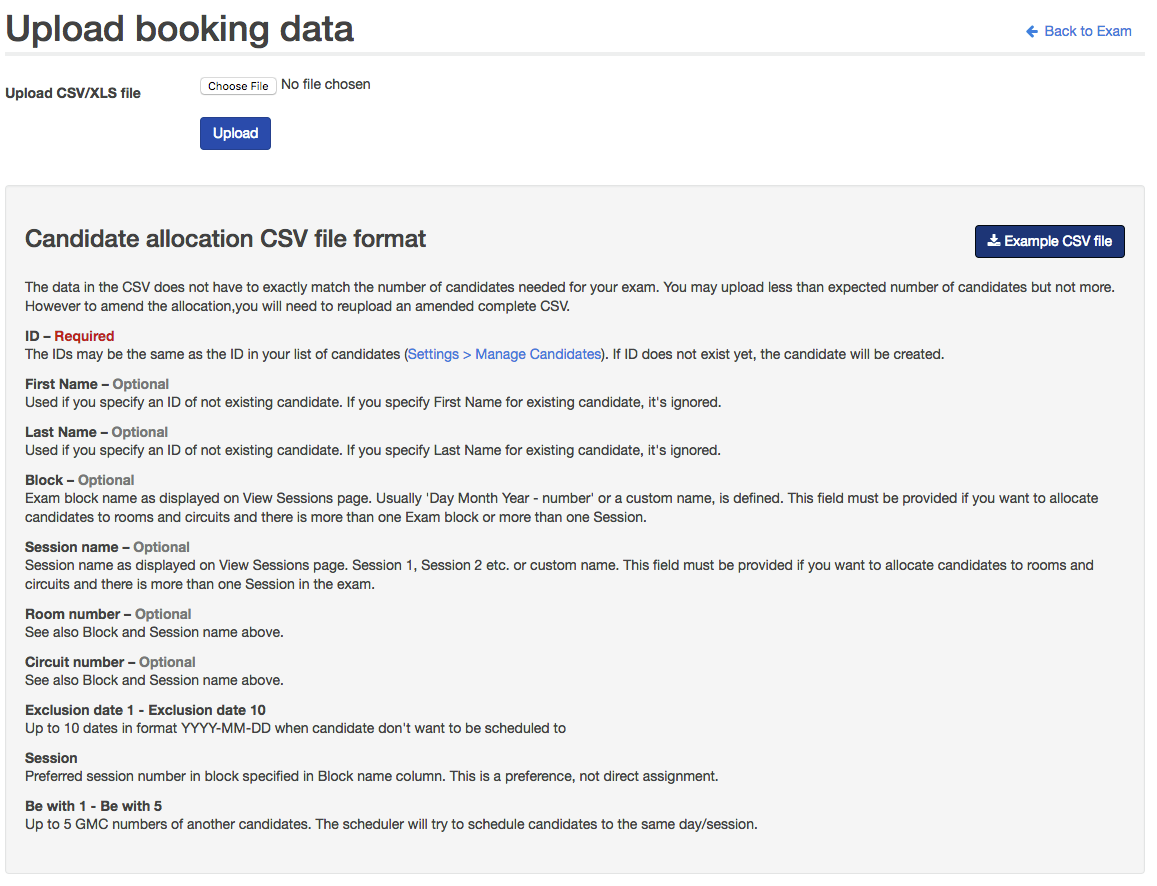
- Click on Example CSV file to download a sample excel file.
- Populate the CSV file with the details of the exact number of students as the number of stations in your exam. For now, we assume that there are no rest stations. Fill in the ID, First Name and Last Name. For now, leave the column of Block, Session name, Room number and Circuit name blank as these are optional. Save the File.
- Under ‘Upload CSV/XLS file’ click choose file.
- Select the sample CSV file which you have saved.
- Click Upload.
- Under Candidates, click Lock changes.
You will be asked to confirm that you want to lock the changes. Click Lock Changes.
If you need to make any changes to the Candidates, all you need to do is to unlock the changes by clicking the Unlock changes button.
Now we will input the examiners, marshals (invigilators) and who they are marking.- Under ‘Examiners’ click Allocate examiners.
Like the students, we could do this manually, but here we will use the excel upload. The book will be provided for the tutorial, but the format required is:
- ID – an identifier for the examiner. You could use their GMC number or whatever you decide, but each examiner should keep the same ID between exams so it is worth agreeing a format beforehand
- First Name
- Surname
- Block – The full date, then a dash, then the block of the exam. E.g. “30 November 2016 – 1”
- Session – The Session for the examiner, e.g. “Session 1”
- Room – The station the examiner occupies, e.g. 3 (should be blank for marshals)
- Circuit – The number of the rotation the examiner is on e.g. “1”
- Role – Examiner or Marshall, should be “E” or “M”
- Click Upload Examiner allocation
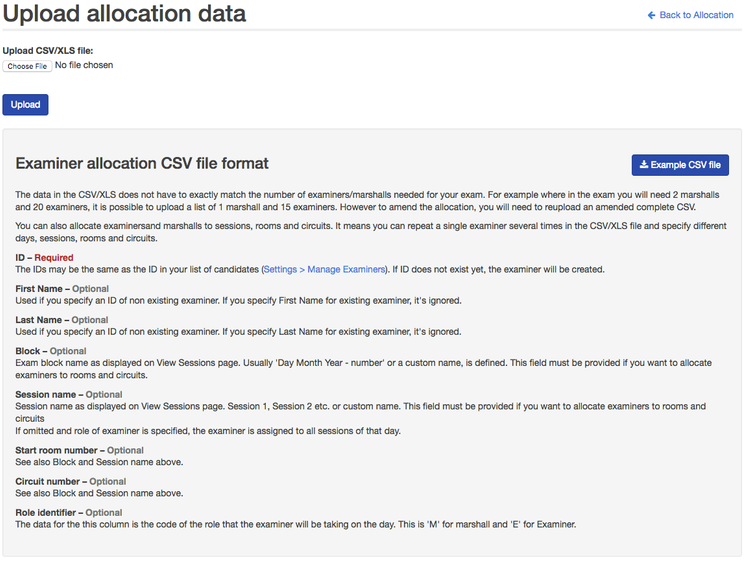
- Click on Example CSV file to download a sample excel file.
- Populate the CSV file with the details of at minimum the same number of examiners as the number of stations in your exam. Add the details of at least one person who will act as the Marshall. Fill in the ID, First Name and Last Name. For now, leave the column of Block, Session name, Room number and Circuit name blank as these are optional. In the Role column, assign "E" for if the person can only act as an Examiner. Assign "M" if the person can act as both a Marshall or an Examiner. Save the File.
- Under ‘Upload CSV/XLS file’ click Choose file
- Select the sample CSV file which you have saved.
- Click Upload.
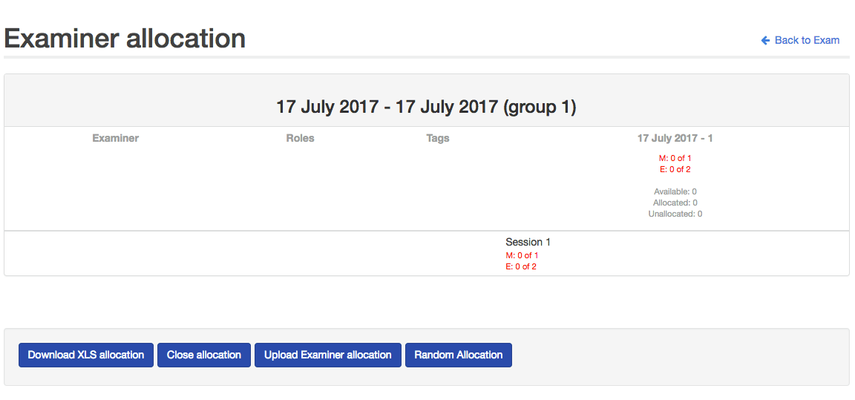
- Click Allocate Examiners.
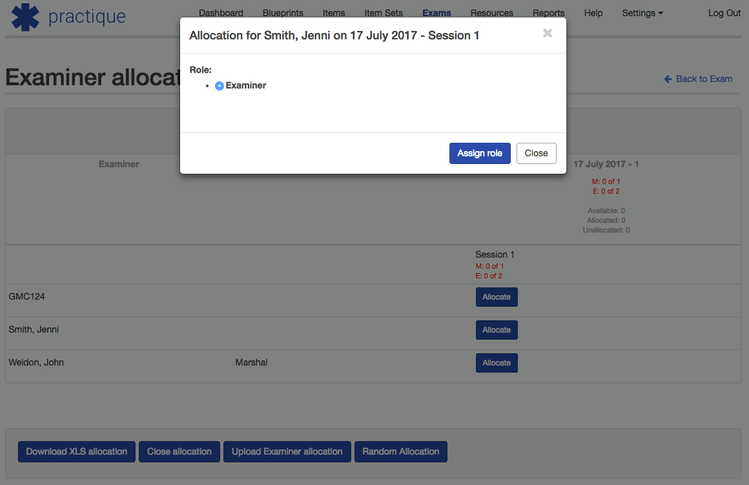
Now we confirm whether the allocation looks OK.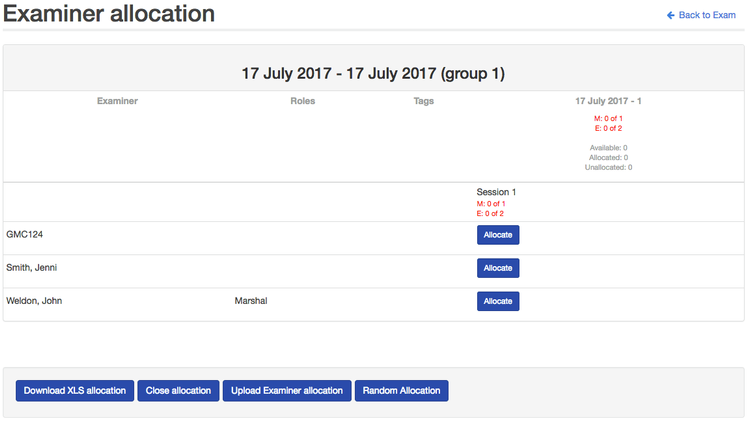
- Click on Allocate to assign a person to be an examiner in this exam.
- Click on Allocate to assign a person available to be a marshal to be a marshal in this exam.
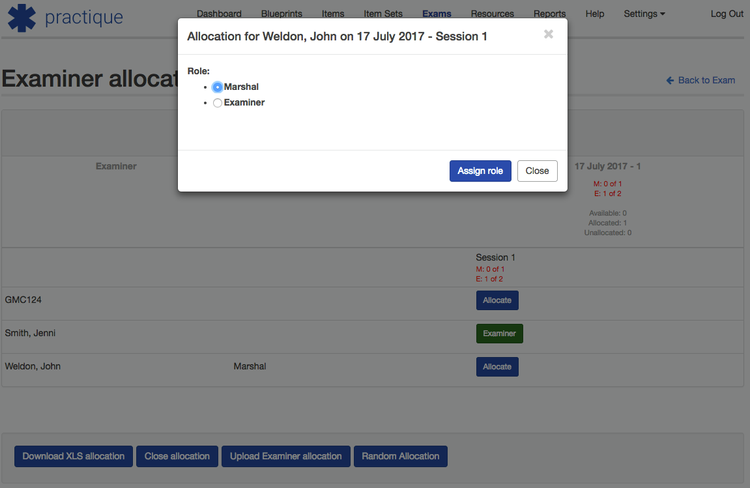
- Once you have allocated the required number of examiners and marshals, the heading in the Examiner/Marshall column will turn black from red.
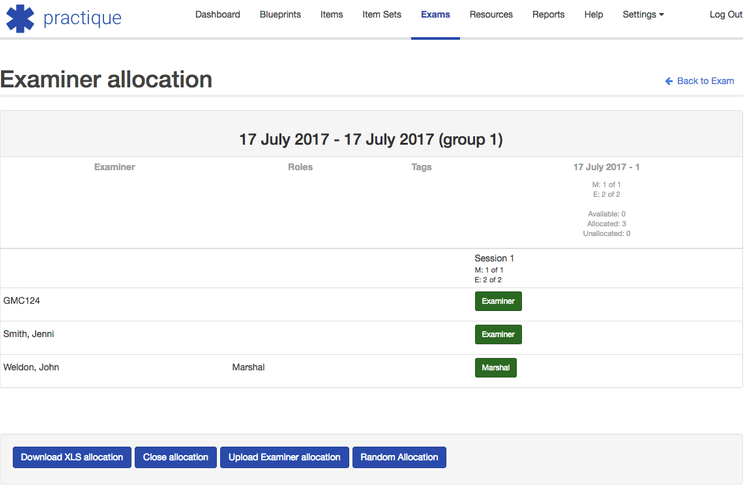
- Click Close allocation
- If the green bar has not moved after you have closed the Examiner allocation, you may need to review the availability. Click on Review Availability and then on Close Availability.
- Under Examiners, click Lock changes.
- You will be asked to confirm that you want to lock the changes. Click Lock Changes.
You could also allocate role players for our OSCE if you maintain a list of them, but you don’t need to, so we’ll skip that step. - Under Role Players, click Lock changes.
- You will be asked to confirm that you want to lock the changes. Click Lock Changes.
Our Exam is now made and ready to go! Let’s try it out.
Starting Exams
- Click the Exams tab.
- Find your exam, and click on View.

- Click on ‘View Sessions’
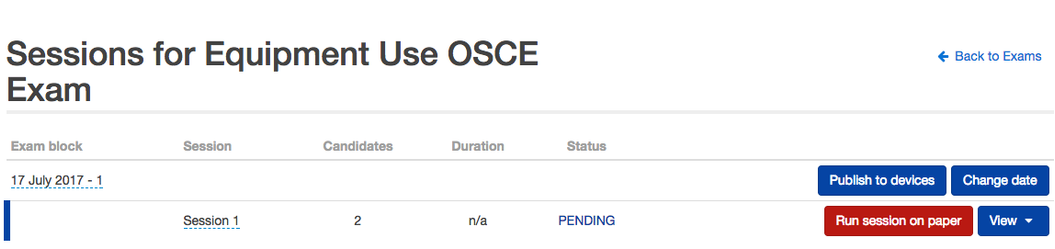
- Click Publish to devices.
The exam will be loaded on to devices. This should be done the night before at the latest. When you are ready, start the session: - Click on the ‘Dashboard’ tab
- Find your exam and click Start session
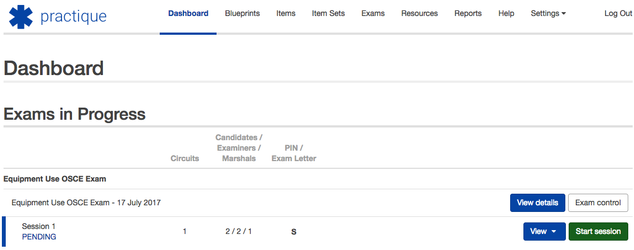
The exam is ready to start.
For examiners and marshals (invigilators) to log in, they need to use their ID, prefaced with the letter on this screen listed under ‘Pin / Exam Letter’. You can find the login details by clicking View > Logins.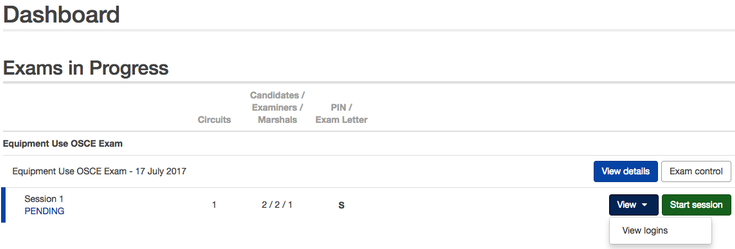
The Login details pages: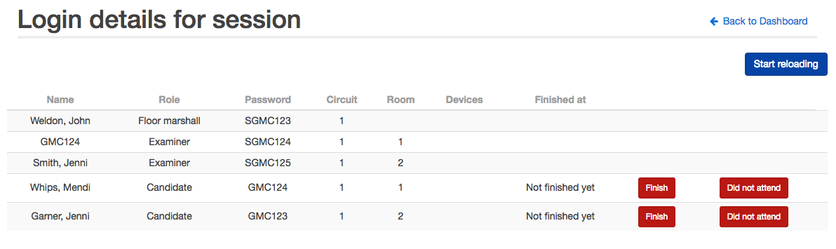
Once you have finished the exam, you will need to close off the sessions Click Stop session.

You will be asked to confirm whether you really want to stop the session. Click Stop.
If you have not completed all the marksheets or submitted all the marks before stopping the session you can force the session to stop by ticking Force stop session.
Your exam is now complete! The results are available in the Exams tab, by clicking Set Standard.
- Tip: If you want to run the same exam again, click View > View Sessions > Reset exam day. You will need the administrator's password to proceed. This will allow you to publish the same exam to the device again. You can use these steps to verify that an exam is displaying correctly prior to exam day.