You will require this information when you are first creating or editing the layout and content of a cover page.
How to manage the layout of a cover page:
- If you are creating a Cover page for the first time, once you have given the page a title and created it, you will be taken to a blank cover page. The two main differences to notice here are that you now have two new options on the editors bar, 'Compose' and 'Layout'.
- To edit the layout of the page and select what content will appear where on the page, clink on the 'Layout' option in the editors bar - you will be taken to to a page that shows you the various tiles available on the left in a menu bar, and the layout of the page on the right hand side. Please note, even if you have selected an empty layout when creating the Cover page, there will be one predefined row with one predefined column in it.
- In the left hand menu 'Drag and drop tiles' you will see at the top a 'Row' tile and a 'Column' tile. These are what you will use to create the grid on the page that you will then fill with content.
- Adding rows and columns is easy. Simply drag the tile to where you would like it to be situated.
- When adding a row, you drag the tile to the area of the page for the content and you will see a green indicator of where you will be dropping the row - above or below the current row.
- Once you have created a row, you can now break it down into columns by simply dragging the column tile into the row. When you drop a column tile into a row, the columns will automatically resize to give each column an equal width - this can be changed subsequently. The row that the column is going to be dropped into will be highlighted grey. Please note, the Cover pages functionality is only designed to accommodate a MAXIMUM of 12 columns, but even this many should be used with caution, it will make the space for content very small.
- You will see on each of the rows and columns that there is a grey 'x' in the top left corner, clicking on this will remove the column or row respectively, along with any tile that may be included within it.
- Once you have added the columns to the rows, you will see that there are two small black arrows (
 ). If you click on these, you will see a pop up:
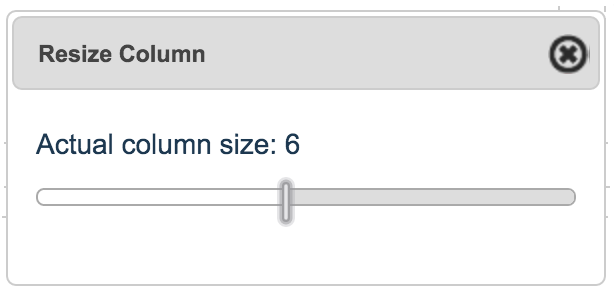
This allows you to adjust the width of the column that you are trying to edit. Once you start editing the width of the columns manually, they will no longer automatically resize, and they will break onto two lines if the total width of the columns is more that 12.
- We advise that once you have created your layout, before adding any tiles, that you save the layout. Scroll to the bottom of the page, and underneath the tiles menu, you will see a 'Save' button. The 'Save' button will change from orange to green, once the page has saved. Please note, it will not have to reload to save.
- You are now ready to add the tiles into the rows and columns where you would like them to sit:
- Drag any of the tiles into the location that you want them (you can always change their order and arrangement, even once you have added content to the tiles by dragging and dropping between rows/columns).
- The column that you will be dropping the tile into will be highlighted grey to show you where it will drop.
- You can add multiple tiles stacked on top of each other in one column, you do not need a new row for every new tile you wish to add.
- Once you have added all the tiles that you require, scroll to the bottom of the page, and save the new layout.
- You are now ready to add content into the tiles, to do this, now click on the 'Compose' tab in the editors bar.
Related articles